React Native - First Steps
May 16, 2020 - 15 min read
Mobile development is a whole new world. Photo by mirkosajkov.. Mobile development is a whole new world](/static/488d792eb8e6e8c7e982eb862a6a1cc0/faddd/react-native-first-steps.jpg)
First things first
Yeah, I'll admit... I've been keeping an eye on React Native for a long time, but never really have the change to stop and set up a development environment to play around with it. I've played around before with mobile development twice, one with the (defunct?) WindowsCE (using C# 2.0 at the time) and later, with Android on the pre-Android Studio era. I remember that it was kinda painful to make the JVM, Eclipse and Android Tools to agree on something without having to waste a non-trivial amount of time messing with configuration, paths and whatnot. This made learning mobile development on my own a not-so-rewarding experience and, eventually, I simply gave up and moved on.
Now, in 2020, I've decided to try again, this time with React Native and take a look at how better the developer experience is right now. I'm very happy to say that the situation improved dramatically and the development workflow is as nice as it can get. If you're also "on the fence" about messing around with mobile development, keep reading and follow me as we set up the prerequisites and create a simple mobile app.
An important note, though: I'm on Linux, so my focus here will be installing and running an Android application. If you're on Mac you can also deploy the application on an iOS emulator to see the small differences between platforms. With that said, let's start with the prerequisites...
Installing the prerequisites
First of all, to run a React Native application you can follow two distinct paths: using the Expo CLI or the React Native CLI. The Expo CLI has the interesting advantage of being very easy to set up and is generally considered the recommended path for beginners, as explained in the setup instructions. If you're following this route, you will need only to install expo-cli, initialize your project with expo init, and skip to the next section.
For paranoid people like me, that insist on using the native tools directly, the process is a bit more involved. Make sure you have a JDK 8 available (nearly all distros have at least openjdk available, which works fine). The next step is to install Android Studio by first downloading it from the official website. After the download, extract the file content somewhere, add the bin directory to $PATH, and run the studio.sh script, that will guide you through the installation process. Just leave everything on default for now, and after all is said and done, start the Android Studio up and choose the option Configure > SDK Manager on the Welcome screen.
You need to make sure to install the Android 9 (Pie) API, by checking the following options (you might also need to check Show Package Details to be able to see some of these options):
The required SDK Platform options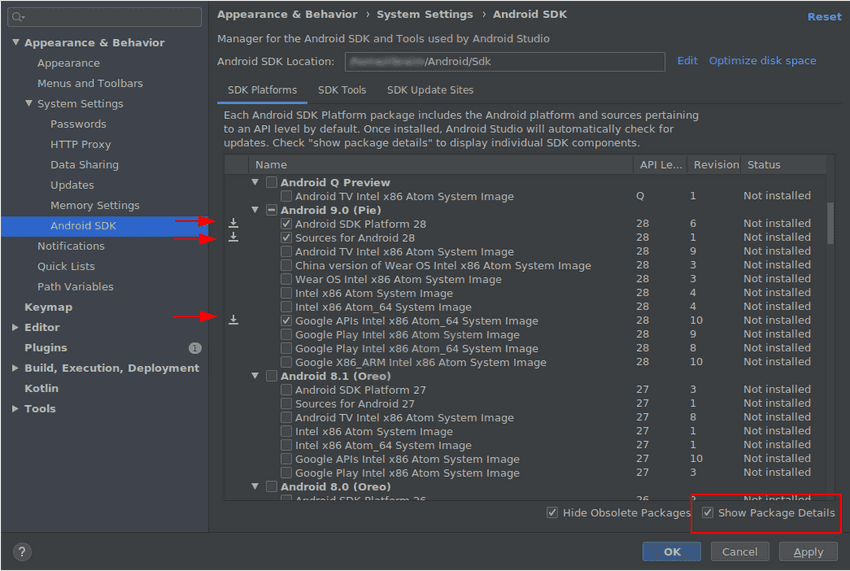
In the same screen, make sure to check the 28.0.3 on the "SDK Tools" tab, like that:
The required SDK Tools configuration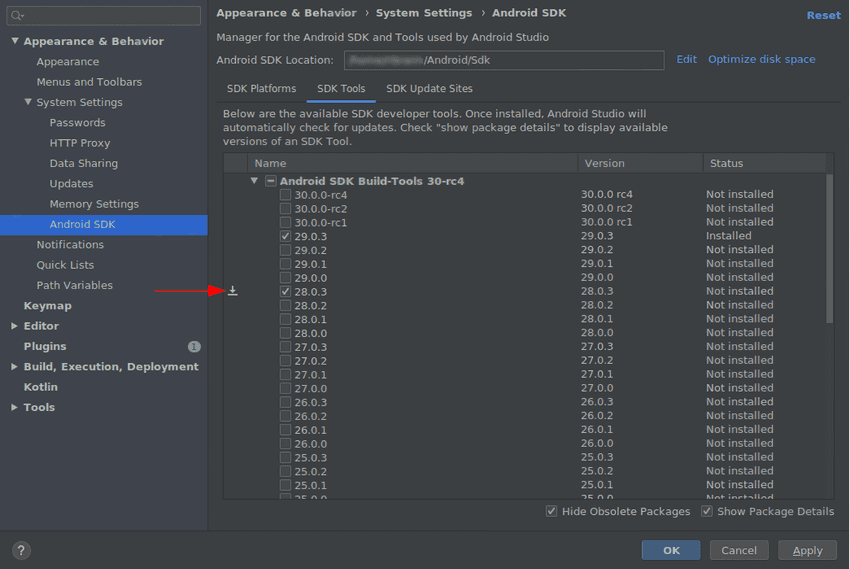
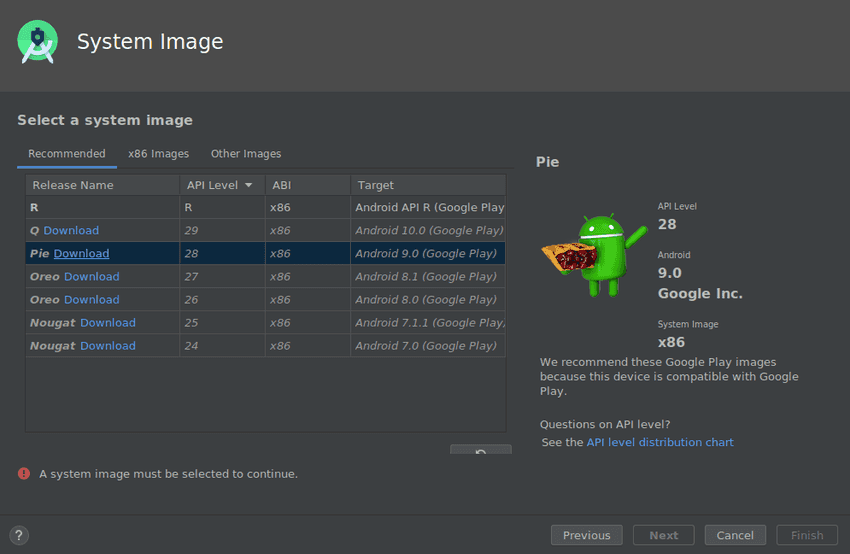
Click on OK and go make a coffee, because this one may take a while to download (1GB+). After that, back on the Welcome screen, choose the Configure > AVD Manager, and choose Create Virtual Device. On the next screen, choose a device of your liking (I will use the default Pixel 2) and click Next. This next screen is the System Image selection, and you must choose the Pie image, as shown below:
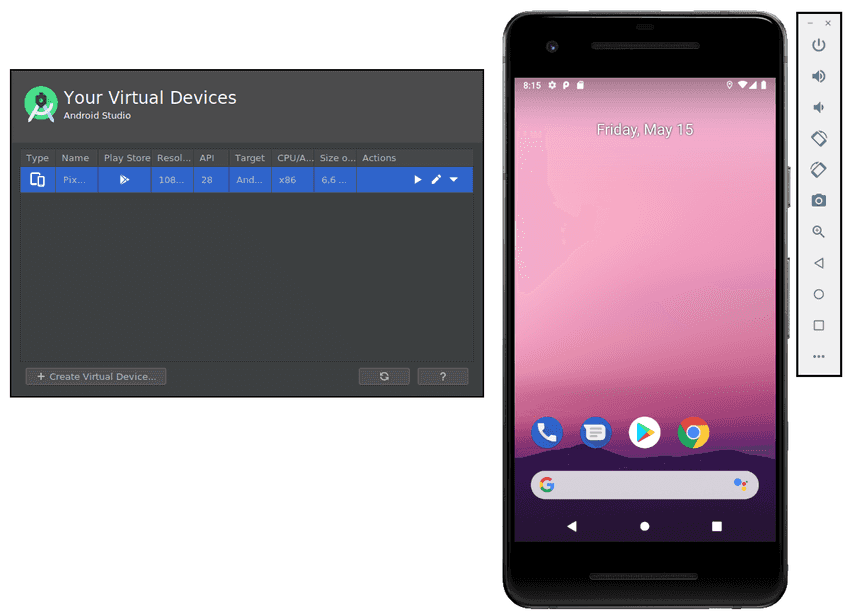
Note that if you don't have the image (like me, on the screenshot above), click on Download to get it and be able to proceed to the next step (again, this download will take a while...). After that, just continue with the process normally until you go back to the main AVD screen. From there, you can click on the Play button and, if everything is working, you will have a running android emulator available:
If you've come this far, congratulations! Now that the hard part is over, we can finally start our first React Native project.
Creating a project
Finally, after all that setup, it is time to create our first project. Open your terminal and run:
$ npx react-native init ReactNativeDemo
# this will take a while...
And... go make another coffee, because this one will also take a while to download and set up the first time. As you might guess, this will create the ReactNativeDemo folder with boilerpart source code. As usual, the project name can be anything you want, as long as you use only alphanumeric characters for the project name. This means that react-native-demo, for example, will fail (because of the '-' character).
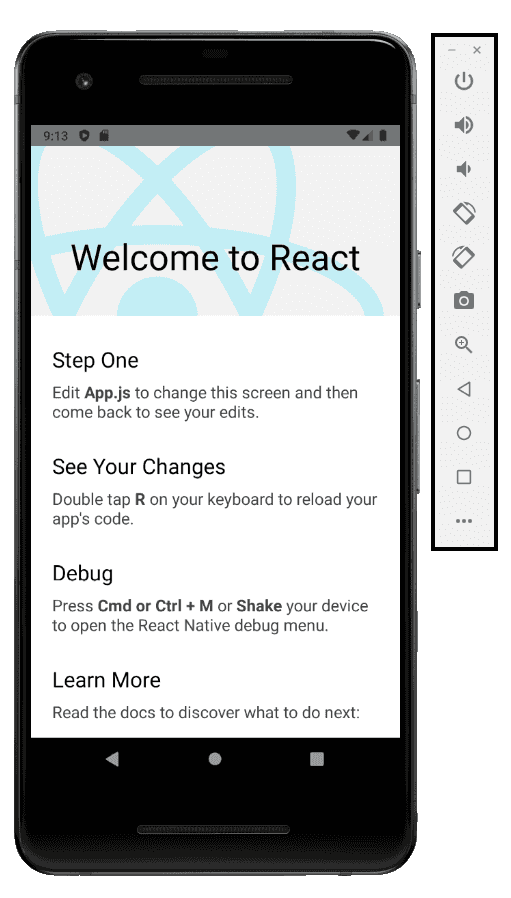
Once the template creation finishes, you will be greeted with a nifty React logo and the instruction to run on Android or iOS. Let's get this running by starting the emulator instance we created previously (if not already started), cd into the project root and run the start and run-android commands:
# first, make sure the emulator is running.
# you can do that from the command-line,
# without opening the AVD UI.
#
# First, list the available AVDs
$ emulator -list-avds
Pixel_2_API_28

# Now, start the emulator by providing the
# desired AVD name
$ emulator -avd Pixel_2_API_28

# with that out of the way, it is time to
# start the Metro development server
$ npx react-native start

# run our application
$ npx react-native run-android
You may have noticed that the first command react-native start is an ongoing process, while the second one (run-android) isn't. This happens because the first one starts the Metro Bundler, thas is the development server that will keep our code changes in sync with the device/emulator, the same way a "normal" React application behaves with the browser. The second command is just the initial deployment of our application, and once deployed, Metro will keep our code in sync during development.
If everything worked out for you, you will see the emulator running our template application:
Try to open the App.js and modify some text while the emulator is running. You will notice the instantaneous update on the running emulator, similar to the web experience we know and love with React.
This is cool and all, but tradition mandates that our first application must be a "Hello World", so delete everything from App.js and change it to:
import React from 'react';
import {Text} from 'react-native';

const App = () => <Text>Hello, world</Text>;

export default App;
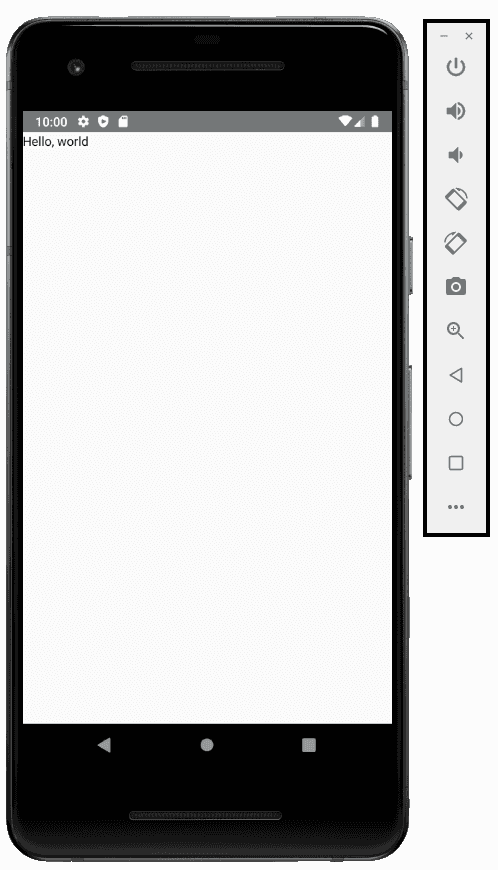
This is pretty standard React code, save for the Text component. As expected, we can't just render HTML tags; instead, we need to render based on the list of available components. In our example, the Text component is one of the most basic ones and has the sole purpose of displaying text, similar to a <p> tag. If you take a look at the emulator, you will see the result:
Really simple, right? What about giving it some style? Change your code to the following:
import React from 'react';
import {Text} from 'react-native';

const App = () => (
  <Text
    style={{
      color: 'red',
      fontSize: 30,
      fontWeight: 'bold',
      textAlign: 'center',
    }}>
    Hello, world
  </Text>
);

export default App;
When you save this file, you will notice that now our "Hello world" text is changed accordingly. Styling in React Native is always done using the style prop, the accepts an object (it must be an object, no strings allowed!) with styles and name that, for the most part, match how CSS works in the browser. Note that this is not CSS, so make sure to check if the style property you want to change is available by checking the documentation of the relevant component.
This first example was done with inline styling, but in a real scenario, we would create a stylesheet with one or more styles to apply to this component. For that, we need to use Stylesheet.create to define a collection of styles:
import React from 'react';
import {StyleSheet, Text} from 'react-native';

const App = () => <Text style={styles.important}>Hello, world</Text>;

const styles = StyleSheet.create({
  important: {
    color: 'red',
    fontSize: 30,
    fontWeight: 'bold',
    textAlign: 'center',
  },
});
We simply moved the inlined style from our Text to a named object property in our new styles constant and referenced it. No big mysteries here, and once you save this file, you will see that the result is identical to our inline code. It may not look that it is worth the trobule using this with a simple component like ours, but when you have various components, with different styling in each one, the separation between the rendering and the styling makes the whole thing a lot easier to read.
Stepping up to the challenge
Now that we have a working "hello world" demo behind us, let's try something a little more involved and create a simple listing application. The idea is that we will be able to add items to a list by typing into a TextInput and clicking on a Button. Once in the list, we can remove items by doing a "long press" (keep your finger "down" for a couple of seconds) on the desired item.
First, let's give our application a bit more style by creating a big, colorful header for it. To do so, create a new file, Header.js, with the following code:
import React from 'react';
import {Text, StyleSheet} from 'react-native';

export default ({text}) => <Text style={styles.header}>{text}</Text>;

const styles = StyleSheet.create({
  header: {
    color: 'white',
    backgroundColor: '#8e24aa',
    textAlign: 'center',
    fontSize: 30,
    padding: 15,
  },
});
Nothing new here, just a Text component with an appropriate style, accepting a text prop. Right below this header, we will want a single component to handle the input from the user and raise an onAddItem event, passing the text typed by the user. To do that, we will need to use a TextInput and a Button component, and arrange them accordingly into a View component:
import React, {useState} from 'react';
import {View, TextInput, Button, StyleSheet} from 'react-native';

export default ({onAddItem}) => {
  const [text, setText] = useState('');

  // handles the onchange when the
  // user types something
  const onChangeText = newText => setText(newText);

  // handles the button pressing
  const onPress = () => {
    if (onAddItem) {
      onAddItem(text);
    }
    setText('');
  };

  return (
    <View style={styles.container}>
      <TextInput
        style={styles.input}
        placeholder="Type here..."
        value={text}
        onChangeText={onChangeText}
      />
      <Button title="Add" color="#8e24aa" onPress={onPress} />
    </View>
  );
};

const styles = StyleSheet.create({
  container: {
    flexDirection: 'row',
    justifyContent: 'space-between',
    alignItems: 'center',
  },
  input: {
    flexGrow: 1,
    borderWidth: 1,
    borderColor: '#eee',
    height: 36,
  },
});
This is simply a View wrapping a TextInput and a Button. Note the styling used, since inside a View component, we can define style rules using a Flexbox Layout, very similar to what we're used to in CSS, with just different defaults. Here, we style the TextInput to grow the maximum possible, leaving only the minimum space needed for the button.
The logic of this component is very simple: is uses the State Hook together with the onChangeText and value properties of the TextInput to keep the current typed value in the text constant. Last, we add an onPress event handler to the button and call the onAddItem event (that we should receive from a parent component) with the current text, resetting the text right after that, so the user can readily add another item. This is pretty standard React stuff, and you probably have seen it a million times before.
The next part is to render our items in a list. To do so, the plan is to receive an array of strings on the items prop representing items to render and, when a long press in an item is done by the user, raise an onDeleteItem with the index of the item to delete. This event will be provided by a parent component, that will take the appropriate action and update the list for us.
To make this works, we will need the help of the FlatList component. Create a new file, ListItems.js, with the following content:
import React from 'react';
import {StyleSheet, View, Text, FlatList, TouchableOpacity} from 'react-native';

const ListItem = ({data, onDelete}) => {
  const {item, index} = data;

  return (
    <TouchableOpacity
      style={styles.touchable}
      onLongPress={() => onDelete && onDelete(index)}>
      <View style={styles.view}>
        <Text style={styles.text}>{item}</Text>
      </View>
    </TouchableOpacity>
  );
};

const ListItems = ({items, onDeleteItem}) => {
  return (
    <FlatList
      data={items}
      renderItem={item => <ListItem data={item} onDelete={onDeleteItem} />}
      keyExtractor={(_, index) => index.toString()}
    />
  );
};

const styles = StyleSheet.create({
  touchable: {
    backgroundColor: '#f4f4f4',
    padding: 15,
    borderBottomWidth: 1,
    borderBottomColor: '#ddd',
  },
  view: {
    flexDirection: 'row',
    justifyContent: 'space-between',
    alignItems: 'center',
  },
  text: {
    fontSize: 20,
  },
});

export default ListItems;
Even if you're experienced with plain React, this code has some details that may throw you off. First, ignore the ListItem component and focus on ListItems: this is simply a wrapper for a FlatList, where we receive the items (remember, we will pass a plain array of strings) and the onDeleteItem event. The items is passed directly into the FlatList.data property and then we specify a function for the renderItem prop, that will define how exactly our items will be rendered.
And here we have a catch: the item on renderItem is not the same value that we passed on data. The item parameter of the renderItem prop is a value decorated by React Native that wraps the original item with metadata. According to the documentation, the wrapped item has the props index, separators, and item which contains the original value passed to the data prop.
In practice, this means that if we pass, for example ['Foo', 'Bar', 'Baz] into the data property, internally, the list used by React Native will look like:
[
  {
    index: 0,
    item: 'Foo',
    separators: ...
  },
  {index: 1, item: 'Bar', separators: ...},
  {index: 2, item: 'Baz', separators: ...},
]
This is the reason why we also need to provide a keyExtractor to the FlatList. The keyExtractor of our example receives two parameters: the decorated item (which we ignore) and the array index, that we simply convert to string and return (note that the API requires the return value of the keyExtractor to be a string).
After wrapping your head around that, take a look at the ListItem component. It receives the decorated item on the data prop and extracts the item from it (the original value of our string array) to render the text inside a view. This is wrapped by a TouchableOpacity component that is a component responsible to add a "flicking" effect when a user clicks on an item and, conveniently, has an onLongPress event available for us.
The logic of the ListItem is very easy to follow: it receives an onDelete event from its parent (the ListItems component), extracts the index of the decorated item and simply calls the event with that item to notify that a deletion should occur.
With all the required components created, the last change we need to make is to rewrite our App.js to use these new components and handle the events correctly. Go ahead and replace the App.js file with the following content:
import React, {useState} from 'react';
import {View} from 'react-native';

import Header from './Header';
import AddItem from './AddItem';
import ListItems from './ListItems';

const App = () => {
  const [items, setItems] = useState(['React', 'React Native', 'Redux']);

  // handles the 'Add' button click
  const onAddItem = text => {
    const clonedItems = items.slice();
    clonedItems.push(text);
    setItems(clonedItems);
  };

  // handles the deleting of an item
  const onDeleteItem = index => {
    const filteredItems = items.filter((_, idx) => idx !== index);
    setItems(filteredItems);
  };

  return (
    <View>
      <Header text="My List Application" />
      <AddItem onAddItem={onAddItem} />
      <ListItems items={items} onDeleteItem={onDeleteItem} />
    </View>
  );
};

export default App;
First, we use the State Hook with an initial value, so we don't start with an empty screen. Then, we define the onAddItem, that receives the text typed by the user, push it to the end of a cloned items array, and update the state. A similar logic is used on the onDeleteItem handler, but this time we remove and item instead of adding one.
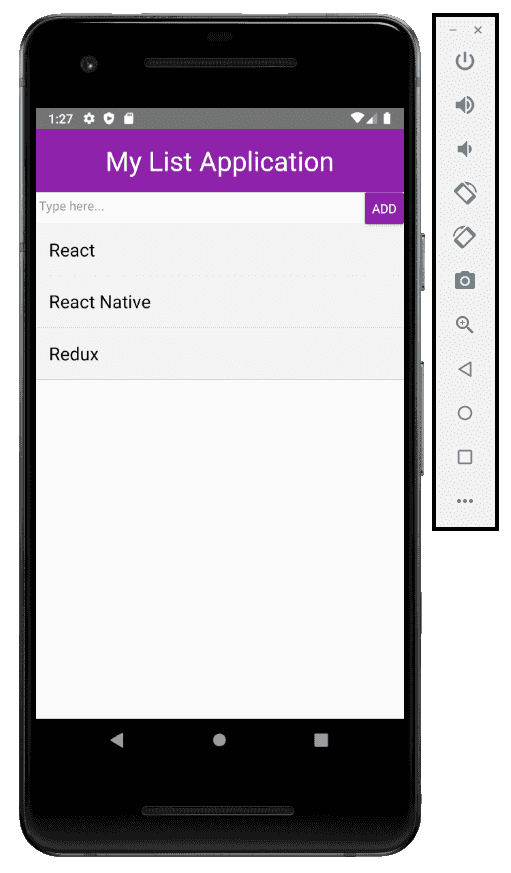
Finally, we put our Header, AddItem and ListItems inside a View component and pass the required props. After saving this file, the result in our emulator should look like that:
Play around a bit with the emulator by typing something and clicking on the Add button. Also, note the "flick" effect when you tap an item (courtesy of TouchableOpacity). Do a long press by holding an item for a second and see that the item is removed from the list.
Final words
And that's it for today. Our application might not be exactly ground-breaking, but we did learn a fair bit about most of the basic components, how to do styling, and how to handle simple lists.
It might not be enough to turn you into a full-fledged mobile developer, but it certainly shows that most of your existing React knowledge can be translated directly into mobile development with React Native. I hope you've enjoyed and, as always, you can browse the source code on GitHub.
Code Overload

Personal blog ofRafael Ibraim.
Rafael Ibraim works as a developer since the early 2000's (before it was cool). He is passionate about creating clean, simple and maintainable code.
He lives a developer's life.
